Tuesday, September 25, 2012

Setting Up a Fixed Port for WMI


WMI runs as part of a shared service host with ports assigned through DCOM by default. Starting with Windows Vista, you can set up the WMI service to run as the only process in a separate host and specify a fixed port.
A fixed port makes WMI easier to use behind firewalls, but in Windows Vista you cannot use scripts that make asynchronous calls. For more information about asynchronous calls, see Calling a Method.
The following procedure is an automated setup to allow WMI to have a fixed port. The procedure uses the winmgmt command-line tool.
Bb219447.wedge(en-us,VS.85).gifTo set up a fixed port for WMI
  1. At the command prompt, type winmgmt -standalonehost
  2. Stop the WMI service by typing the command net stop "Windows Management Instrumentation"
  3. Restart the WMI service again in a new service host by typing net start "Windows Management Instrumentation"
  4. 4. Establish a new port number for the WMI service by typing netsh firewall add portopening TCP 24158 WMIFixedPort

Specify a fixed port other than 24158
To do that you'll need to do the following:

1. open DCOM Config  (dcomcnfg)

2. find "Windows Management and Instrumentation"

3. Open the properties and select the Endpoints tab.

4. Edit the properties of the "Connection-oriented TCP/IP"

This should be done either before stopping the WinMgmt service or before starting it backup.  Don't forget to modify the firewall opening to reflect the new port.

Monday, September 24, 2012

Resizing Virtual disks and some annoyances


Resizing Virtual disks and some annoyances

Increasing the size of a virtual disk is a routine job, especially in a Windows environment. Since Virtual Infrastructure 3.5, the Client offers the ability to adjust the size of a Disk File. But sometimes, there are some annoyances.

So open the Virtual Machine Properties dialog box and discover that the Provisioned Size has been greyed out. The cause is in the name of the Disk File, ending with 000001.vmdk. This means there are Snapshot here!


Rule 1: If you want to resize a Virtual Disk, delete the Snapshots!
After deleting snapshots, it is possible to increase the Virtual Disk.

The First step was succesful, now in Windows 2003 we must use the Microsoft DiskPart utility to increase the size of the partition.
1.       Open a Windows command prompt and enter the first command
> diskpart
2.       The prompt changes to DISKPART>. To be sure that we extend the right partition we want some overview
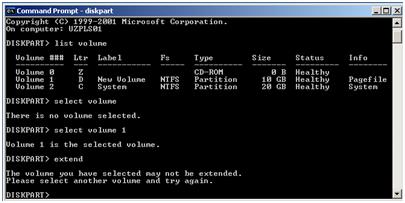
DISKPART> list volume
3.       In this example our partition has drive letter D which is Volume 1, so the next command is:
DISKPART> select volume 1
4.       And the final command to extend the partition:
DISKPART> extend

Instead of increasing the partition, this message appears: “The volume you have selected may not be extended. Please select another volume and try again”.
The cause for this message? for some reason a Pagefile was put on Volume 1, as you can see on the overview under “Info”.
Rule 2: DiskPart cannot extend a volume that has a Pagefile!
After moving the Pagefile, it is time to enjoy the extra disk space.

Source: http://paulgrevink.wordpress.com/2010/11/07/resizing-virtual-disks-and-some-annoyances/

How to Disable Content Advisor in Internet Explorer (Windows 9x and NT)

The following steps will remove any password set in the Content Adivisor and allow you to reset the program to its original state.


1) Click on Start and choose Run.
2) Type in RegEdit and select OK.
3) Now click on the little plus sign to the left of [H_KEY_LOCAL_MACHINE].
4) Continue down, clicking the plus signs of the named key, through 'Software', 'Microsoft', 'Windows', 'Current Version' and 'Policies'. (ie.

+[H_KEY_LOCAL_MACHINE]

+Software

+Microsoft

+Windows

+CurrentVersion

+Policies


5) Now click on the Ratings folder.


6) In the right pane of the RegEdit window, you'll see an icon called Key.

Click on it and press Delete.


7) Next, choose Registry and then Exit to exit RegEdit.


You've just deleted your original Content Advisor password.


8) Restart the computer and run Internet Explorer again.


9) Choose View and then Internet Options (or Options for version 3.x)


10) Click on the Content tab and if the (Enable/Disable) button still says Disable, click on it,

When asked for a password, don't enter anything; just click on OK.


This will disable Content Advisor because there's no longer a password.

Thursday, September 20, 2012

Adobe Flash Player Distribution -- Download .exe and .msi


Wednesday, September 19, 2012

VMware: Windows 2008R2 template configuration


image
Virtual Hardware (VMX) template configuration:
Hardware:Value:
Memory2 GB
CPU’s1
Video cardAuto-detect video settings
VMCI deviceNone
SCSI Controller 0LSI Logic SAS, bus sharing: none
Hard disk 140 GB, Thin (after deploy always Thick)
CD/DVD Drive 1Client Device
Floppy Drive 1Removed
Network Adapter 1VMXNET3, network: VM Network with DHCP (for joining domain)
General OptionsOS: Microsoft Windows Server 2008 R2 (64-bit)
VMware ToolsAdvanced: Check and upgrade Tools during power cycling
Virtual Machine Version7

Microsoft Windows Server 2008 R2 template configuration:
- Install always the latest VMware Tools (in my case: ESXi 4.1 build 260247)
image

- Change the CD/DVD Drive 1 from drive letter D:\ to X:\
image
- Install VMware display driver: VMware SVGA 3D (Microsoft Corporation – WDDM)
image
Driver located: C:\Program Files\Common Files\VMware\Drivers\wddm_video\
- Windows Updates: Install all available Windows Updates
image
- Enable Remote Desktop Protocol: Allow connections from computers running any version of Remote Desktop (less secure)
image
- Performance Options: selected: Adjust for best performance
image
- Startup and Recovery: Change the default value from 30 seconds to 5 for faster rebooting. Write debugging information: Small memory dump (256 KB)
image
- Disable UAC: Never notify when: Programs try to install software or make changes to my computer + I make changes to Windows settings
image
- Disable Windows Firewall: Domain networks: Off , Home or work(private networks: Off, Public networks: Off (service must be enabled and started.. don’t change this)
image
- Notification bar: Always show all icons and notifications on the taskbar
image
- Customize Start Menu: Number of recent programs to display: 1 + Number of recent items to display in Jump List: 1 , and uncheck some options like “help” and “highlight newly installed programs”.
image
- Internet Explorer: Turn Internet Explorer Enhanced Security off for Administrators. Leave it On for users.
image
- Internet options: Use black + Check: Delete browsing history on exit
image
- Account: Select for local Administrator account: Password never expires
image
- Desktop: Show icons on the Administrators desktop
image
- Folder options: Check Allows show icons, never thumbnails + Allows show menus + Display the full path in the title bar. Uncheck: Hide extensions for known file types
image

- Remote Desktop: Disable restrict user single remote RDP session
image
Location: MMC: Local Group Policy: Computer Configuration\Administrative Templates\Windows Components\Remote Desktop Services\Remote Desktop Session Host\Connections\Restrict Remote Desktop Services users to a single Remote Desktop Services session
Customization Specifications Manager:

- Use virtual machine name. This because I use sometimes scripts to deploy multiple VM’s with PowerCLI 
image

- Join automatic the Windows domain
image

- Always generate a new SID before you join a domain even it’s Windows 2008
image

Wednesday, September 12, 2012

Migrate printer server 2003


Migrate printer server (backup and restore)

1.       Install Microsoft Printer Migrator 3.1 in printer server
2.       Run backup/restoreà file.cab file

How to view and transfer FSMO roles in Windows Server 2003


Transfer the Schema Master Role
Use the Active Directory Schema Master snap-in to transfer the schema master role. Before you can use this snap-in, you must register the Schmmgmt.dll file.


Register Schmmgmt.dll
1.       Click Start, and then click Run.
2.       Type regsvr32 schmmgmt.dll in the Open box, and then click OK.
3.       Click OK when you receive the message that the operation succeeded.
Transfer the Schema Master Role
1.       Click Start, click Run, type mmc in the Open box, and then click OK.
2.       On the File, menu click Add/Remove Snap-in.
3.       Click Add.
4.       Click Active Directory Schema, click Add, click Close, and then click OK.
5.       In the console tree, right-click Active Directory Schema, and then click Change Domain Controller.
6.       Click Specify Name, type the name of the domain controller that will be the new role holder, and then click OK.
7.       In the console tree, right-click Active Directory Schema, and then click Operations Master.
8.       Click Change.
9.       Click OK to confirm that you want to transfer the role, and then click Close.
Transfer the Domain Naming Master Role
1.       Click Start, point to Administrative Tools, and then click Active Directory Domains and Trusts.
2.       Right-click Active Directory Domains and Trusts, and then click Connect to Domain Controller.

NOTE: You must perform this step if you are not on the domain controller to which you want to transfer the role. You do not have to perform this step if you are already connected to the domain controller whose role you want to transfer.
3.       Do one of the following:
o    In the Enter the name of another domain controller box, type the name of the domain controller that will be the new role holder, and then click OK.

-or-
o    In the Or, select an available domain controller list, click the domain controller that will be the new role holder, and then click OK.
4.       In the console tree, right-click Active Directory Domains and Trusts, and then click Operations Master.
5.       Click Change.
6.       Click OK to confirm that you want to transfer the role, and then click Close.
Transfer the RID Master, PDC Emulator, and Infrastructure Master Roles
1.       Click Start, point to Administrative Tools, and then click Active Directory Users and Computers.
2.       Right-click Active Directory Users and Computers, and then click Connect to Domain Controller.

NOTE: You must perform this step if you are not on the domain controller to which you want to transfer the role. You do not have to perform this step if you are already connected to the domain controller whose role you want to transfer.
3.       Do one of the following:
o    In the Enter the name of another domain controller box, type the name of the domain controller that will be the new role holder, and then click OK.

-or-
o    In the Or, select an available domain controller list, click the domain controller that will be the new role holder, and then click OK.
4.       In the console tree, right-click Active Directory Users and Computers, point to All Tasks, and then click Operations Master.
5.       Click the appropriate tab for the role that you want to transfer (RIDPDC, or Infrastructure), and then click Change.
6.       Click OK to confirm that you want to transfer the role, and then click Close.

How to force DNS to update a new dns server in the domain 2003


right click on DNS zone - All Tasks - Reload,
it will replicate DNS record with other DNS server in AD.

How to Add DHCP PXE Options to Microsoft DHCP Server 2003


Summary
This article describes how to add DHCP options 66 and 67 on a Microsoft 2003 DHCP Server so that the 3Com PXE service on Provisioning Server (Ardence) does not have to be used.
Background
Prior to using the Microsoft DHCP Server to provide the IP address information, Provisioning Server/TFTP Server name/IP address, and Boostrap file name during the client boot process, stop and disable the 3Com PXE service on the Provisioning Server and configure options 66 and 67 in the Microsoft DHCP service.
Procedure
To configure the Microsoft 2003 DHCP Server with DHCP options 66 and 67, perform the following:
1. Open the Microsoft DHCP Server management console and select your DHCP server.
2. In the Toolbar, click Action and select Set Predefined Options from the menu.
3. Click Add to add the DHCP options.
4. The Option Type window appears.
5. Enter the Name:
• For option 66, enter Boot Server Host Name
• For option 67, enter Bootfile Name
6. For the Data Type, select String.
7. For the code, enter 66 or 67 (depending on which option is being set).
8. Enter the description:
• For option 66, enter TFTP Boot Server Host Name
• For option 67, enter Bootfile Name
9. Click OK.
10. Then enter the Ardence/TFTP Server name/IP address for option 66 or Bootstrap file name for option 67 in the string value.
Example:
• For a value in option 66, 192.x.x.x
• For a value in option 67:
o    'VLDRMI13.Bin' (Ardence 3.x)
o    'ARDBP32.BIN' (Ardence 4.x and Provisioning Server 4.5)
11. Click OK.
The clients will now obtain their IP address information along with the Provisioning Server/TFTP Server name/IP address and Bootstrap file name during the network boot process.


XP: Find computer UUID


1. run wbemtest.exe
2. Click Connect. Change Namespace to root\cimv2, and hit connect.
3. hit Enum Classes... button, it will pop up a dialog, choose Recursive and
hit OK.
4. in the Query Result dialog, you will see Win32_ComputerSystemProduct
class, Double click it and it will pop up a Object editor dialog.
5. In the Properties listbox, choose UUID and click Instances button. In the
Query Result dialog that pops up, double click and another Object Editor
dialog will pop up. This time, it contains the UUID for the computer.


xcopy: Copy a Folder to Another Folder and Retain its Permissions


Copy a Folder to Another Folder and Retain its Permissions
1.        Click Start, and then click Run.
2.        In the Open box, type cmd, and then click OK.
3.        Type xcopy sourcedestination /O /X /E /H /K and then press ENTER, where source is the source path for the files to be copied, and destination is the destination path for the files.
Example
Type xcopy c:\olddocs c:\newdocs /O /X /E /H /K, and then press ENTER, where olddocs is the source folder and newdocs is the destination folder.

current policies prevent instances of mmc invoked from scripts from opening in author mode


current policies prevent instances of mmc invoked from scripts from opening in author mode


run regedit, under HKCU\software\policies\microsoft\mmc there should be a DWORD value labeled RestrictAuthorMode with value of 1. change this to 0 and MMC should now work.

Uninstall Active Directory 2003


Uninstall Active Directory
Updated: March 2, 2005
Applies To: Windows Server 2003, Windows Server 2003 R2, Windows Server 2003 with SP1, Windows Server 2003 with SP2
To use the Active Directory Installation Wizard to remove Active Directory, you must know the password to assign to the local Administrator account of the server after Active Directory is removed.
Administrative Credentials
To perform this procedure, you must be a member of the Domain Admins group.
To uninstall Active Directory
1.    Click Start, click Run, type dcpromo and then click OK.
2.    The Active Directory Installation Wizard appears. Click Next at the Welcome screen.
3.    You have an option to select This server is the last domain controller in the domain. If you select this option, the wizard attempts to remove the domain from the forest. Do not select this option. Click Next.
4.    At the Administrative Password screen, enter and confirm the password that you want to assign to the local Administrator account after Active Directory is removed. Click Next.
5.    At the Summary screen, verify that the information is correct and then click Next to proceed with the removal.
6.    The wizard proceeds to remove Active Directory. After it finishes, the wizard displays a completion screen. Click Finish to close the wizard.
7.    Click Restart to restart the domain controller.

Troubleshooting Active Directory 2003 Replication Problems


To retrieve replication status
1.       Open a command prompt, type the following command, and then press ENTER:
repadmin /showrepl * /csv >showrepl.csv
2.       In Excel, on the File menu, click Open.
3.       In Files of type, click Text Files (*.prn;*.txt;*.csv).
4.       In Look in, navigate to showrepl.csv, and then click Open.
5.       In the Excel spreadsheet, right-click the column heading for showrepl_COLUMNS (column A) and then click Hide. Repeat for the column labeled Transport Type.
6.       Select the row just under the column headings, and then, on the Windows menu, click Freeze Pane.
7.       Click the upper-left corner of the spreadsheet to highlight the entire spreadsheet. On the Data menu, point to Filter, and then click AutoFilter.
8.       In the heading of the Last Success column, click the down arrow, and then click Sort Ascending.
9.       In the heading of the Source DC column, click the down arrow, and then click Custom. In the Custom AutoFilter dialog box, complete the custom filter as follows:
a.        Under Source DC, click does not contain.
b.       In the corresponding text box, type del to filter deleted domain controllers from the spreadsheet.
10.    In the heading of the Last Failure column, click the down arrow, and then click Custom. In the Custom AutoFilter dialog box, complete the custom filter as follows:
a.        Under Last Failure, click does not equal.
b.       In the corresponding text box, type 0 to filter for only domain controllers that are experiencing failures.
For every domain controller in the forest, the spreadsheet shows the source replication partner, the time that replication last occurred, and the time that the last replication failure occurred for each naming context (directory partition). By using Autofilter in Excel, you can view the replication health for working domain controllers only, failing domain controllers only, or domain controllers that are the least or most current, and you can see the replication partners that are replicating successfully.
Attempting to Resolve Problems
Replication problems are reported in event messages and in various error messages that occur when an application or service attempts an operation. Ideally, these messages are collected by your monitoring application or when you retrieve replication status.
Most replication problems are identified in the event messages that are logged in the Directory Service event log. Replication problems might also be identified in the form of error messages in the output of the repadmin /showrepl command.
repadmin /showrepl Error Messages That Indicate Replication Problems
To identify Active Directory replication problems, use the repadmin /showrepl command as described in the previous section. The following table shows error messages that are generated by this command, along with the root causes of the errors and links to topics that provide solutions for the errors.
repadmin /showrepl Error Messages